Workshop training: Bleeding Magura disc brakes with Tony Barton
To continue our training series, CI.N has pulled on the knowledge of Tony Barton at Magura who guides us through the process of bleeding Magura disc brakes.
Have a mechanic that needs a know-how tune up? Put the kettle on and catch Barton’s wisdom here!
Kit you may need: The Service kit Magura sells is £28.30 and Pro Bleed kit is £40.30. Contact the service centre to grab your supplies on +44 1455 823303, or open an account here.
Step one:
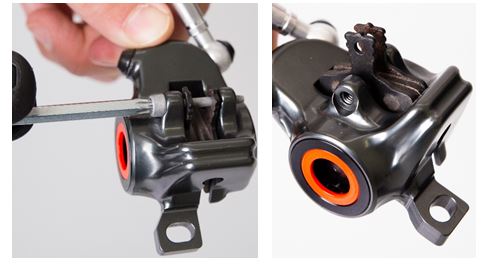
Attention: Use only the short M6 barbed fitting. To begin, push back the piston carefully.


Step Two:
Remove the brake pad fixing screw with the Torx T25.
Take out the brake pads
- single brake pad to the backside
- double brake pad (MT5) to the frontside
Remove the caliper
Screw in the brake pad fixing screw by hand. Clip the Transport device on to it take care that the thick side will be between the piston.


Step Three:
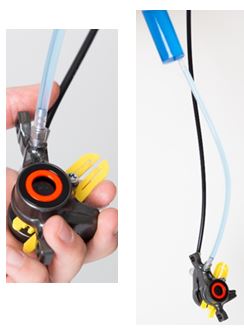
Unscrew the bleeding screw and screw in the filled syringe and use 8mm spanner to tighten.
Take care of the position of the caliper.
Step Four:
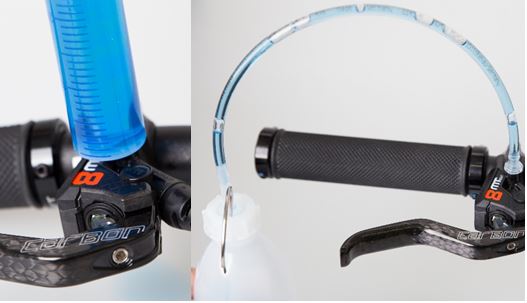
Turn the Master in the horizontal position, take care that the EBT will be the highest point.
Remove the EBT screw with a Torx T25.
Step Five: 
Install the syringe with hole or use the pro bleed kit.
Press the oil from the bottom to the top and pull it also back.
Do this 3-4 times.
Pull the lever blade during the bleeding also 3-4 times and let it snap back.
Step Six:
Remove the syringe or pro bleed kit carefully.
Take care that there will always oil surface tension on top. If necessary push the syringe again.
Turn in carefully the EBT screw and close the master. Torque 0.5Nm.
Remove the syringe at the caliper.
If you will hold the caliper on the same level as the master the oil will stay on top at the bleeding screw.
Turn in the bleeding screw and tighten.

Step six:
Clean the brake.
Re- install the brake pad.
Check the brake for leakage and function.


